Archive for the ‘Gifts’ Category

Gift Giving Ideas 2011

Are you still searching for the perfect gifts to give this holiday season?  Here are a few ideas that may be new to you that will bring smiles to all your friends and family.

FOR MEN

The Art of Shaving gift boxes – amazon.com or theartofshaving.com

Everything bacon – BaconFreak.com

Rubber mens ID bracelet – thingsremembered.com

Paracord bracelet – amazon.com

ROKU digital media streaming player – amazon.com

Wifi Sim Card – amazon.com

Why a Curveball Curves, Popular Mechanics – amazon.com

FOR WOMEN

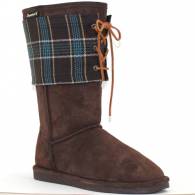
Bootskins to accessories your Ugg boots

Pot Clip -  www.solutions.com

Slap Watches – www.solutions.com

Gift certificate for cooking or baking classes

All You magazine subscriptions

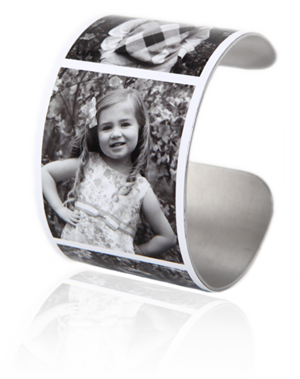
Photo Bracelet – pickturethat.com

Personalized cake pans – thecakepanlady.com

31 Gifts bags and organizing totes – Contact Carrie Askins

FOR KIDS

Hallmark recordable books

Fun Balloon Pets – myownpetballoon.com
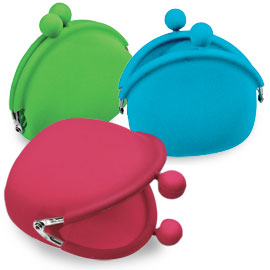
Silicone Coin Purse -  www.solutions.com

FOR EVERYONE

Personalized IPad and Kindle cases -  Shopmyedge.com

Personalized License plate frame

Custom stationary and address labels – vistaprint.com

DIY Photo books, blurb.com

Storage Water bottle – Amazon.com

Piggies & Paws Artwork – Find a local consultant

Happy shopping and hope you have a very Merry Christmas and Happy New Year.

Photo Bracelet pickturethat.com ($24)

Why a Curveball Curves, Popular Mechanics ($18)

Shopmyedge.com ($35)

Myownpetballoon.com ($15)

Storage Water bottle Amazon.com ($13)

Bootskins.net ($20-30)

Piggies and Paws ($35)

Wifi Sim card ($40)

The Art of Shaving gift boxes Amazon ($25)

BaconFreak.com

Silicone Coin Purse www.solutions.com ($10)

Pot Clip

www.solutions.com ($4)

Slap Watches www.solutions.com ($20)

6 pack Reindeer

Mens ID Bracelet

Things remembered ($25)

Recordable Books

Hallmark ($30)

Paracord bracelet Amazon.com ($6)

ROKU digital media streaming player – Amazon ($50-100)

Blurb Books($25+)

Custom stationary

Vistaprint.com

Personalized

license plate

Personalized cake pans

thecakepanlady.com ($31)

Flower Headbands

Flower Headbands

MaterialsIMG_4839

Artificial Flowers

Headbands

Acrylic Jewels

Felt

Hot glue gun and glue

There are a large variety of headbands available so make sure you try a few out and find a style that is comfortable for your head.  Children’s headbands are also available.  I used both plastic and cloth varieties to show you more than one way to utilize the headband that works best for you.

The Basic Headband

IMG_4843Remove all the flowers from the stems.  Keep the leaves as you might want to add them to your headband for more color and volume.  Disassemble the flower pieces removing the hard plastic backing and center piece.  Lay them out in the order you take them off the stem.

Using hot glue secure the layers of the flower to each other starting with the largest petal and working to the smallest.  Glue a jewel to the center of the flower.

Next it is time to glue the flower onto the headband.  Using a mirror determine where you want your flower to sit on your head.  You can put it wherever you think it looks cute.  You may even want it in the center depending on your hair cut.  If you are using a cloth headband the placement is not as important as you can adjust the flower once it is one your head.

Put a large drop of glue on the back of the flower and press it onto the headband.  Hold it for a few seconds so the glue can cool.  DON’T BURN YOURSELF.  Cut a strip of felt to cover the back of the flower.  Place hot glue on the back of the flower which will also cover part of the headband.  Secure the felt to the glue forming a soft flat surface that will sit against your head.

Style your hair, put the headband on, but most importantly have fun and look cute.

Variations:

-For the center of the flower you can use sea beads or buttonsIMG_4853

-Spray the flowers with spray paint.  Gold or silver metallic looks pretty and adds more drama.

-Add tulle behind the flower

-Wrap ribbon around the headband.  This trick is handy if you can’t find a specific color headband.

-Using a variety of sizes of flowers add multiple flowers along the side of the headband for a more dramatic effectIMG_4869

-Use snap barrettes instead of a headband

-Use a needle and thread if you don’t want to use hot glue, especially for cloth headbands for babies.

IMG_4879 IMG_4878IMG_4877

Recycled T-shirt

IMG_4390 IMG_4391 IMG_4396 IMG_4397

Materials:

T-shirtIMG_4371

Felt ( I used felt with a butterfly pattern)

Double stick fusible web

Scissors

Pins

Embroidery thread

Embroidery needle

Iron

Ironing board

Make sure the t-shirt is washed and dried so it doesn’t shrink after you embellish it.

IMG_4373

Start by preparing the shapes you want to add to the t-shirt.  Peel the paper liner off one side of the web, and stick to the back of your felt.  Trace your desired shape(s) on the back of the web.  With a sharp pair of scissors, slowly cut along the shape for a clean edge.IMG_4374

Next, cut the inside seam along the sides and arm hole.  If there is no side seam just cut straight up each side.  I find it easiest if you turn the shirt inside out and follow the surged line.  After each seam is cut you should have a total of 3 pieces (2 sleeves and 1 long torso with the neck whole in the middle). If you are worried that the t-shirt may pull at the side seams you can simple leave the sides together and stitch up the side.

Get your iron plugged in and heated up.  Layout the shapes on your shirt to determine the right placement.  Remove the web paper backing from your shape and place on the shirt.  I suggest turning the shirt inside to iron to avoid the felt getting discolored.  The fusing web directions tell you to use steam, but that ruined my felt.  I removed the water from the iron and the web worked great.  Hold the iron still on the shape for 10-15 seconds. Be careful to not move the iron around.

IMG_4387Now that the shapes are secure on your shirt it is time to reassemble the piece back together.  Line up the edges of the shirt and use pins to keep together.  Don’t get frustrated if the edges are rolling, it will add to the look of the shirt.  Get your needle and thread.  To determine how much thread you will need, simply double the length of the seam you are sewing.  Thread the needle and tie off the end leaving a little extra at the top of the needle.  Anytime you are starting and finishing a seam it is important to secure the ends by making a double stitch at the end (forming a loop).  Start sewing up one side of the shirt using a ¼ inch stitch (in and out motion, nothing fancy here).  Do each of the side first and then move on to the sleeves, first pining and then stitching.

For extra detail you can stitch around the neckline and shoulders.  I loved adding a smaller shape to the arms and back of the shirt.  Be creative with color combinations and varying your shapes.  The t-shirt should be your canvas.  Sometimes simple is better…but do what you like.

Finished shirt should be washed inside out and laid flat to dry.  Avoid the dryer.

This idea was featured on She’s Crafty (ION Life Network) with guest star Teresa Findlay of “Dirty Laundry”.