Season of Love

The Hallmark holiday is quickly approaching…will you be in a loving spirit?  Although many people brush off Valentine’s Day as a useless holiday, I find the holiday to be more than just chocolates and cheesy cards.  If you allow yourself to celebrate love I am sure you will wear a smile on your face and have a better attitude.  Even if you are not in the arms of the perfect mate, Valentine’s Day is a time to celebrate all the love in your life.

Here are a few ideas to get the love flowing in your life:

-Add a few spots of red, pink, and white into your decor.  Hearts are a must!

-Find some local valentine’s cards to send out to family and friends

-Bake.  Food warms the soul and makes even the coldest heart smile.

-Make plans for February 14th no matter your romantic situation.  Not having any plans will just leave you miserable, even if you are in love.  No matter how hard you fight it, this is an important date.  If you find yourself alone, celebrate yourself by eating a delicious meal and taking a bubble bath.

Candy Vase

IMG_4249Materials:

Large vase

Small vase (needs to fit inside large vase)

Flowers (real or artificial)

Candy (I used conversation hearts and red hots)

Ribbon

This is a cute idea to bring drama into a centerpiece for Valentine’s Day and is simple to do.  Gather all your materials and have them close at hand.

Place the small vase inside the larger one.  Pour 2 inches of candy into the large vase to make sure the smaller vase is secure.  Place your flowers in the small vase and arrange as you desire.  Continue filling the larger vase with candy up to the brim.  If you have difficulty getting the candy into the vase, roll a sheet of paper to use as a funnel.  To add a finishing touch, use any ribbon to tie a bow around the vase.

Stained Glass Sugar Cookies

IMG_4224So for anyone who is scared to try new ideas out of fear of failure…get over it.  I saw this cute idea online and thought it would be super fun and easy.  Through a little trial and error I got one good looking cookie out of a dozen.   Don’t take shortcuts on this one and you will be more successful than me plus have beautiful cookies.

Start with your favorite sugar cookie dough.  I took the easy way and got a box mix at the store, which turned out to be a big mistake.  Make sure the dough is nice and cold.  Cover a cookie sheet with aluminum foil and spray with Pam.

IMG_4228

Roll out the dough to ¼ inch thick on parchment paper with flour so the dough will not stick.  Cut out cookies with a large shaped cookie cutter. Using a smaller cookie cutter remove the center of the cookie.  Place on the cookie sheet.

IMG_4229Place hard candies (I used Jolly Ranchers) in a zip lock bag and crush them into smaller pieces.  Place the crushed candy into the center of the cookie.  Be careful to not overfill the center.  Bake according to your recipe, about 8-10 minutes.  The edges of the cookie should be light brown and the candy melted.  Let cool for 5 minutes or until the candy has hardened.

A few tips and tricks:

-try coloring the dough red or pink

-use a textured cookie cutter to add a ruffled effect to the edge of the cookie

-make sure the cookie sheet is placed in the middle of the oven for even cooking.  Rotate the sheet half way through the cooking time.

Here are my results:

IMG_4237

Here is the original recipe:

http://familyfun.go.com/recipes/lovin-from-the-oven-685398

Groundhog Day Cupcakes

A friend sent me an article all about Groundhog Day cupcakes that I had to share.  There are some great ideas.  Take a look at the pictures and you can dissect each part and find candies and cookies that can turn into a groundhog with a little creativity.

http://entertainment.comedy.com/2010/02/02/15-silliest-groundhog-cupcakes

Get Crafting!

When To Decorate?

I am getting ready for the next holiday and wanted to share my decorating calendar.  Don’t be one of those people that have Easter decorations colliding with Halloween.  If you stay organized, changing your themes should be fast and simple…unless you add to your collection like I do.

Here is a schedule of when I like to put up my decorations for each holiday.  Some of these holidays I skip over so don’t think I am that crazy to have a storage tote for each of these.

Put Up

Take Down

Celebration

Notes

Feb 1 Feb 28 Valentine’s Day Feb 14
Mar 1 Mar 31 St. Patrick’s Day Mar 17
April 1 May 15 Spring / Easter I suggest removing all bunnies, eggs, and Easter themed items and leave up all spring decorations for May
June 1 Aug 31 Summer
July 1 July 7 4th of July I like to leave up all my summer decorations, and just add Red, White, and Blue decorations for the 4th.
Sept 1 Nov 28 Fall/Thanksgiving *See below for notes on Halloween
Oct 25 Nov 1 Halloween Depending on your decorations, you may need to take down you fall décor and make room for your haunted treasures.
Saturday After Thanksgiving Saturday following New Years Christmas
Jan 3 Feb 1 Winter

Links for more details and holidays:

http://www.timeanddate.com/calendar

http://www.madmanmike.com/us_holidays_dates.html

Building Your Craft Workshop

Before you begin crafting think through your space and determine where you will craft.  Don’t let a lack of space stop you from starting a project or two.  A card table, kitchen counter, or even the floor will work.  No matter how much space you have, it is important to get organized before you buy any tools or supplies.  Here are a few questions to think about as you get started:

•Where will I store supplies?  This is your first chance to get creative.  If you have one shelf in a linen closet claim the territory with decorative contact paper.  If you have a whole room to work with, divide the space into small work areas.  You can repurpose an old dresser or a desk allowing you to keep organized with multiple drawers.

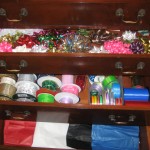
•How you will stay organized?  Depending on the type of crafts you enjoy, there will always be left over supplies that can be used for your next project.  Don’t be wasteful, be organized.  You will also require some basic tools that will need to be stored.  Use plastic bags, Tupperware, baskets, plastic envelopes, or any other storage containers from around the house to keep supplies in their place.

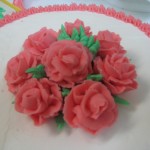
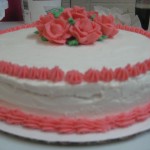
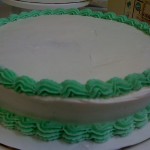
•What type of crafts will you be doing?  The world of crafting is overwhelming.  There is scrapbooking, knitting, pottery, painting, baking, interior decorating, candles, or even jewelry.  Limit your range of crafts as you start out so you can build your inventory of tools and supplies.  Plan out your projects and build a supply list before you head to the craft list.  You will save time AND money.  Talk with friends to see what crafts they enjoy and exchange craft supplies instead of buying everything new.  It is a big disappointment to invest in a hobby that you are no good at.

Think about a builder’s workshop or a mechanic.  Their job is miserable if they are always looking for tools or they are missing parts.  Crafting is the same.  If you are always looking for glue sticks or ribbon you will get frustrated and give up.  Make a plan and get crafting.

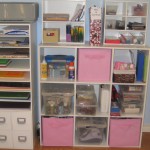
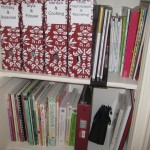
Here is a look into my crafting world.

Key Components:

Closetmaid 9-Cube Organizer with fabric drawers to allow a variety of storage options, magazine files to keep ideas together, and a re-purposed dresser to house all my wrapping supplies.

Craft Tool Box

­­Just like any other hobby, to be a crafter you have to have the right tools and equipment.  Here are a few basics to have on hand no matter what type of crafts you take on.

IMG_4172

Writing and Cutting

Acid Free Markers

Sharpies

Paper cutter

Sharp scissors

Pliers

Wire cutters

X-Acto knife

Paper punchesIMG_4173

Edging scissors

Ruler and tape measure

Sticky Stuff

Glue gun

Craft glue

Double stick tape

Tape dispenser (scrapping style)

IMG_4177

Paper and Paint

Decorative paper

Cardstock

Acrylic paints

Paintbrushes

Extras

RibbonIMG_4155

Pipe Cleaners (aka chenille stems)

Googly eyes

PomPoms

Wilton Cake Class– week 3

Today was my last day of my cake decorating class.  We learned all about roses.  This week was interesting for me as it reminded me that no one is perfect at crafting on the first try.  You may see the photos and think wow, I could never do that.  YES YOU CAN!  I look at the cake and see rough frosting that wouldn’t smooth and lots of gaps.  It takes time to master the technique and then learn tricks of the trade to make a perfect cake…if that is even possible.  Today’s class inspired me to keep trying no matter what happens.  No matter what the end product of your crafting looks like, it is the process that should bring joy to your life.

I highly recommend taking a cake decorating class.  You can save a ton of money on birthday celebrations and make your cakes personalized to the recipient.  To get fun decorating ideas, visit your local cake shop or craft store.

Crafty Links

Here are a few links that you have to check out.  I will add more as I find em.

http://www.bakerella.com: Ideas for cupcake pops (a Bakerella creation), cakes, pies, cupcakes, cookies, brownies and more. You may even find yourself smiling from all the sweetness.  Plus they have adorable shirts.

http://www.bhg.com: Better Homes and Gardens.  So many different ideas for all areas of live.  I love their featured projects for the upcoming holiday.  This site has great pictures for all their ideas.

http://www.blurb.com: Their free software, Blurb BookSmart, allows you to create professional books with just a few clicks of the mouse.  Templates and themes allow you creative control but keep consistency throughout your book.  Upload your finished product to print a professional book and even put it up for sale for others to enjoy.

http://www.flickr.com: the best online photo management and sharing application in the world.  They help people make their content available to the people who matter to them and help you keep your photos and video organized.

http://www.orientaltrading.com: Fun, value-priced products for every occasion.  Find value-priced party supplies novelties, toys, favors, crafts, decorations, treats, and gifts for every season and occasion.

http://picasa.google.com: free photo editing software from Google that makes your pictures look great.
Sharing your best photos with friends and family is as easy as pressing a button!  They also have a online photo album similar to Flickr.

http://wordpress.org: an Open Source project, which means there are hundreds of people all over the world working on it and it is free to you.  WordPress is mostly used for blogs, but the options are endless.  You can find themes to change the look and feel or add widgets providing your site additional functionality.  Craftfullymade is powered by WordPress.  Beware; you will need some IT knowledge or an IT friend

Great Stores to visit for craftspiration:

IKEA         Michaels         Pottery Barn         Pottery Barn Kids         Pier One

Wilton Cake Class – Week 2

Now that my sugar high from last week’s cake is wearing off, it is time for week two of cake decorating.  I had time on Saturday to practice a few techniques from our last class, but had some trouble with my frosting.  Against the teachers recommendation I used shortening from the grocery store which lacks the fat necessary for the frosting to stick together…BIG MISTAKE.  My frosting wasn’t the creamy consistency, but I still learned a lot.  Today I learned how to do a shell border, faces, hearts (kinda look like butt cheeks), star flowers, swirl flowers, and finally a clown.

Next week will be the last and final lesson for course 1, which is all about roses.